Game start and configuration
- Vadym Dorozhenko (Unlicensed)
- Oleksii Kovalenko (Unlicensed)
- Alex Smith (Unlicensed)
- Vitalii Zurian (Inactive) (Deactivated)
First things first
Before we dive into the depths of Planning Poker, let's make sure our setup is right.
After installation
Once installed, the Planning Poker will add a new menu item in the following locations:
- Jira home
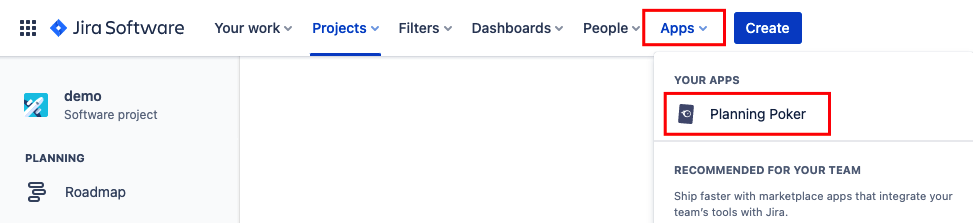
- Project sidebar
- Sprint menu for Scrum boards of Company-managed projects
Things to work with
Before you start your very first Planning Poker game you should provide the app with content to estimate. In order to do this, you have to:
- Create at least one Jira project;
- Create at least one issue, you want to estimate, in any Jira project.
Projects' access rights
Pay attention to users' access rights in the project you're about to estimate. Make sure you've configured access rights so that all users you want to participate in your Planning Poker games are able to view the Project's issues. Otherwise, particular users without view permission on issues won't be able to see the content of such issues during a Planning Poker game - for example, in a voting phase.
Discover more in Project settings and Managing project permissions Jira articles.
Starting game
If you have a project with issues to estimate, you can start your game.
A game can be started from the Planning Poker app dashboard or from Jira Backlog View.
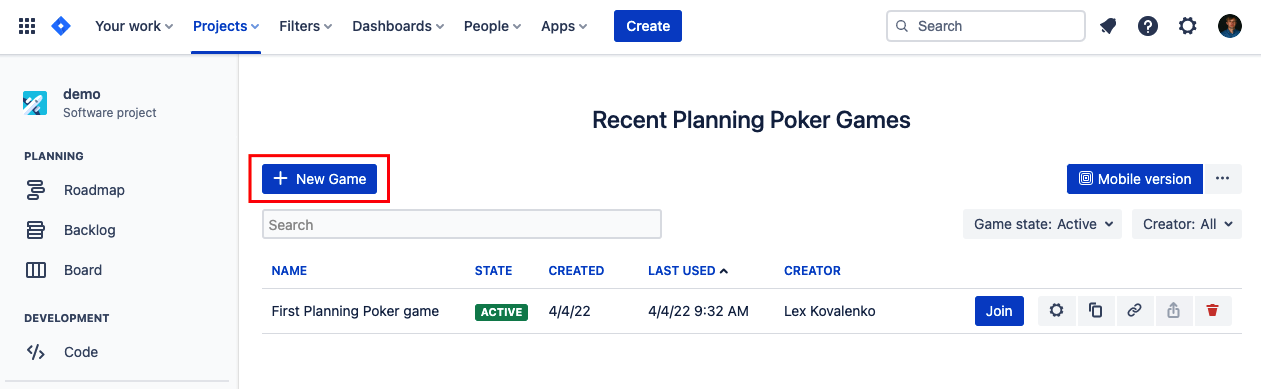
Starting a game from Planning Poker app dashboard
To start a game from the dashboard, simply:
- Click the app icon on Jira home or on the Project sidebar;
- Click "New game" button.
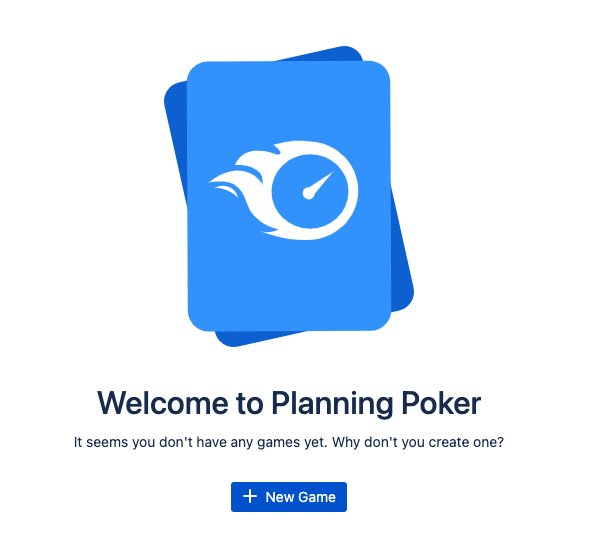
In case you haven't created any games yet, the dashboard looks differently:
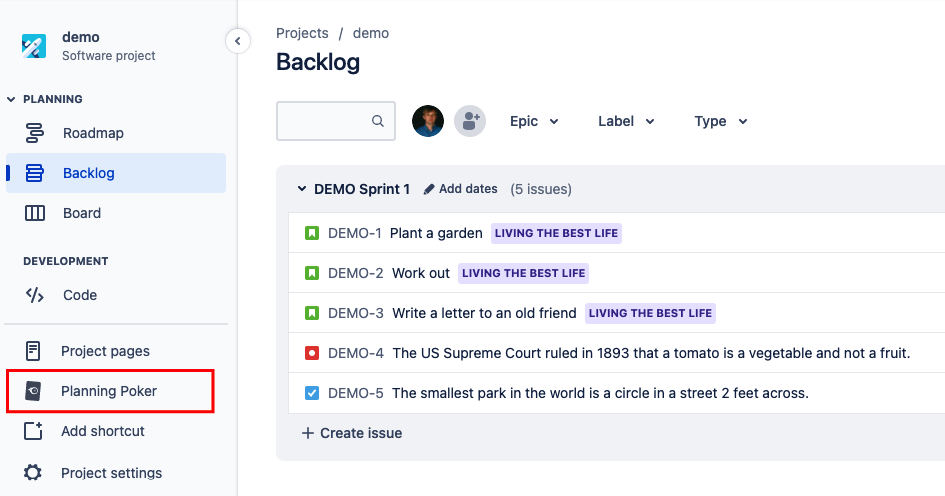
Starting a game from Jira Backlog View
Issues in sprint
In order to start a Planning Poker game from Jira Backlog View, it's required from you to have a started sprint in a Project. The sprint must include issues you want to estimate with Planning Poker.
To start a game from Jira Backlog View, you have to:
- Navigate to Backlog View in your Project sidebar;
- Make sure you've created a sprint containing all the issues you're willing to estimate;
- Select and click "Create Planning Poker Game" item from the sprint options dropdown.
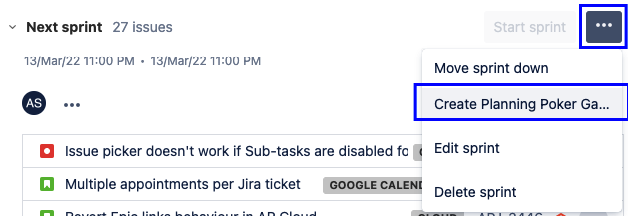
Project type suppot
Please take note that you won't be able to start a game from Jira Backlog View if you are running Jira's Team-managed project.
This feature is currently available only in Company-managed projects.
Configuration
Once you've clicked to create a game in one of the above-mentioned ways, Planning Poker will navigate you to Game Configuration Menu divided into sections, with prompts for game settings. It will help you to customize a future game, making estimations as close to your project's traits as possible.
Recustomization in future
You'll be able to access and change your game settings whenever you want in the future.
Game basics
A very basic game configuration section will ask you to enter the most essential parameters of your game and will provide you with tips.
Game basics configuration section contains the following inputs:
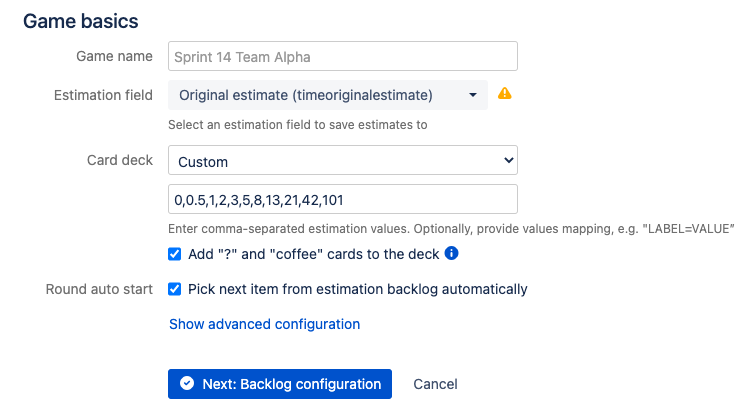
Game name
You can specify a name for the game to make it stand out in your project. There is no restriction on unique game names, so stay creative in order not to get confused when viewing your games list in a Planning Poker Dashboard.
Estimation field
This dropdown provides you with means to choose a field of an issue object, where the estimation points value will be finally stored once the issue was estimated. You can write the estimation to the following issue's fields:
Story Points. The field stores integers. It will suit for saving numerical estimations such as Fibonacci deck type cards or custom numerical deck cards. This is the default estimation field for Company-managed projects of Jira. This one is recommended;
Story point estimate. The field stores integers, similar to the previous field, but it is the default estimation field for Company-managed projects;
Comments. This field stores string values, so it fits to save abstract estimations such as t-shirt sizes or custom deck non-numerical estimation values. This field is available by default in all types of projects;
- Original estimate. This field stores time units such as 1h, 30m, 5m, etc. This field will serve as a good combination together with hours deck type or with a custom deck, containing cards with time units estimation values;
- Custom fields.
Adding a field to an issue type
Please pay attention to the fact that only the Comments field is available for all issue types in both classic and next-gen Jira projects by default.
You won't be able to use Story Points, Story point estimate, and Original estimate out of the box, and will have to add them manually to all the issue types you're about to estimate. Watch this video, to know how to add additional fields to your issue types. Also, discover our FAQ on this topic.
Besides, when you're adding a custom field to an issue type, and the field's name contains "story" or "point" words in it, such a field will be available in "Exports estimates to" dropdown as a custom field.
4. Card deck
In this dropdown, you can choose cards' front values that game players will use to vote when estimating an issue. You're free to pick some predefined card deck templates:
Fibonacci deck, containing 1, 2, 3, 5, 8, 13, 21, 34, 55 cards;
T-shirt deck, containing XXS, XS, S, M, L, XL, XXL cards;
- Labeled T-Shirt deck, containing XXS=0.5,XS=1,S=2,M=3,L=5,XL=8,XXL=13
Hours deck, containing 1h, 2h, 3h, 4h, 5h, 6h, 7h, 8h, 9h, 10h, 11h, 12h cards.
Values mapping
In order to use text or abstract values for estimating numeric custom fields, use values mapping in the format: "LABEL=VALUE”.
For example, Labeled T-Shirt deck does exactly this: XXS=0.5,XS=1,S=2,M=3,L=5,XL=8,XXL=13
Building a custom deck
Whenever you customize a card deck template using special input, it switches itself to Custom card deck (Custom card deck is also available from the dropdown):

While customizing the card deck, make sure you use commas to separate different values.
Cards number in a deck
Remember when you're adding comma-separated cards values to Custom Deck input, you're specifying not only a cards' front type but also an actual number of cards in the deck.
Therefore: if you enter three values (separated by commas) players will be able to use only three cards when estimating issues in the game.
5. Add "coffee" cards
If checked, this adds two additional cards to your deck: "?" and "coffee".
"?": Allows a player to state that they can't be certain about an estimation of the current issue.
"coffee": Allows a player to inform other game participants that they want to take a break.
Example of a deck with "?" and "coffee" cards in it:

6. Round autostart
If checked, the next round of the game will automatically start when the current issue estimation is successfully saved, or the issue was skipped. The next issue to estimate will be automatically picked from the top of the game backlog.
When you're done with basics settings, you may want to take the next step and start editing the backlog in the game. You can always continue to tweak your game with a more sophisticated configuration too.
Switching to advanced configuration
When configuring your game, you can click "Show advanced configuration" to get access to additional game preferences sections such as Deck mapping, Game flow, and Game administration.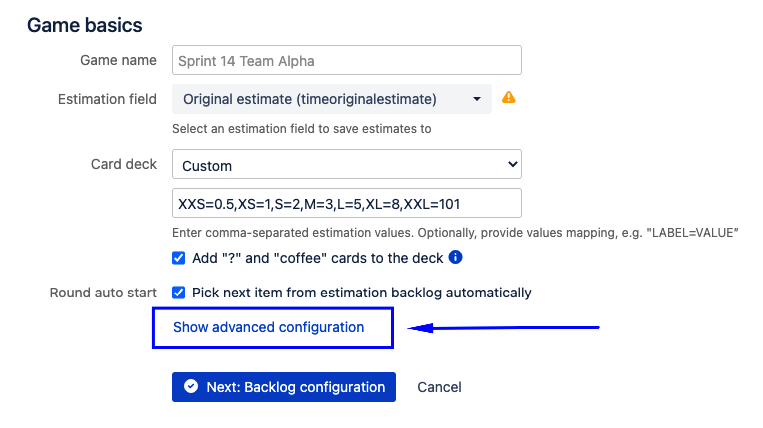
Game advanced configuration
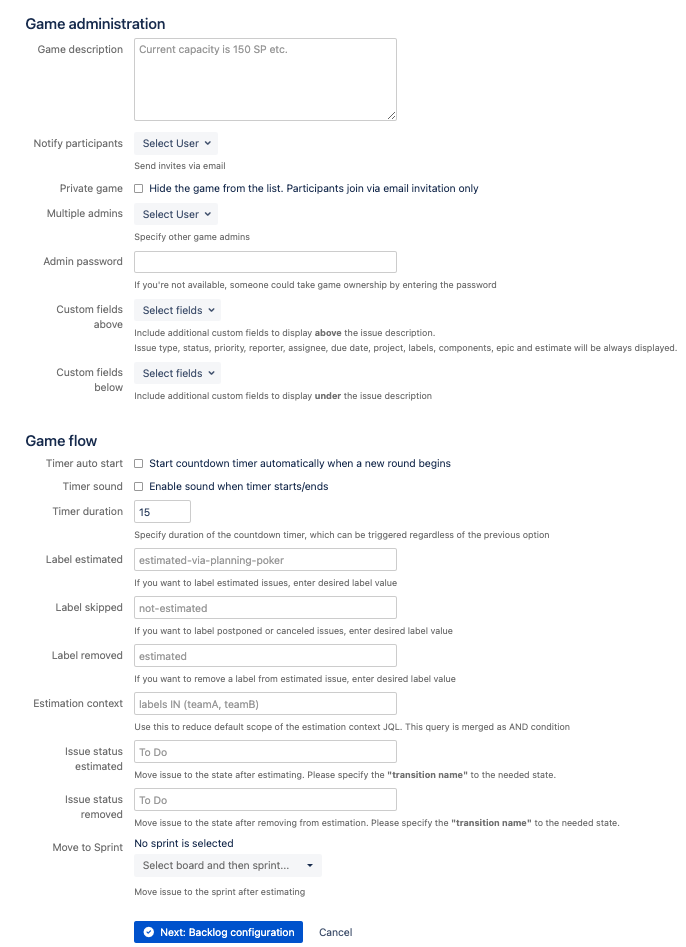
Game administration
Game administration allows you to control both players' and administrators' access to the game.
The game flow configuration section will look the following way and contain the following inputs:
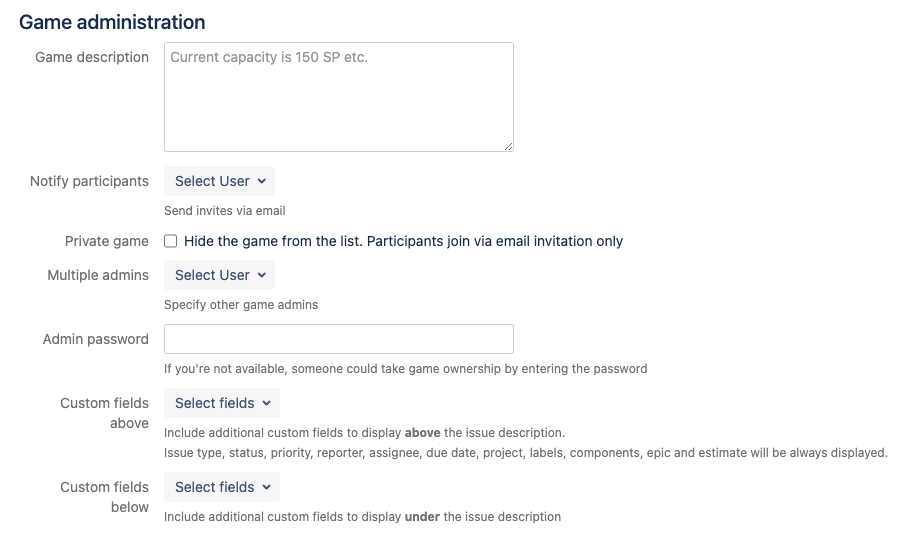
Game description
Describe your game, so its plot and purpose are clear to all estimation participants.
Notify participants
Allows you to choose users from project participants to notify them by email about joining a Planning Poker game. This comes in handy if the estimation session is being held remotely or you've set a game private.
To add a user to a notification list just click on a "Select User" dropdown and search for the desired user by typing username and using autocomplete. You can add several users and manage a notification list by removing users from it. If several users are added to the notification list, notification emails will be sent in bulk to all the users in a list. The notification email contains an URL to join the game.Private game
If checked, will make your game invisible in a Planning Poker app dashboard for all the project participants except the game administrator. You will be able to add users to a private game only by sending them a notification with this game's URL, as described above.
Multiple admins
By default, a game creator alone holds administrative rights regarding the game. In practice, it's often necessary to spread admin rights among other game participants for different reasons.
This feature allows you to add multiple game admins and manage the admins' list. To add an additional game admin press "Select user" dropdown and start typing the user's name to choose a user from the list below.
This list will also display users who currently have administrative privileges regarding the game. To remove such users from the list of game administrators, simply click the red cross icon in front of the user's name.
Equal administrative rights
Please note that all game administrators hold an equal capacity of privileges, meaning that there is no master or regular game admin roles.
This also means each game admin can manage the game's admin list by removing or adding game admins.
Mind it to use additional admins feature wisely.
Admin password
The current game admin may add additional game admins on his own, by using the above-mentioned feature of this configuration section, or by using the "Add additional game admin" button in the game top bar. However, sometimes the current game admin may be unavailable at the moment when there is a need for additional game administrators.
Admin password setting allows other players to become an additional game admin if they know a password set by this option, even in case if current game admin is unavailable.
If the Admin password input is not empty, "Become Game Admin" button appears in a game top bar. By clicking it (1) and submitting an admin password via an opened modal (2) the user becomes an additional game administrator.
6. Multiple custom fields
This dropdown allows choosing custom fields to be displayed under the issue description during a voting phase like this:
Game flow
The Game flow configuration section makes it possible to change the impact of the game process on its participants.
Game flow configuration section looks like this and contains the following inputs:
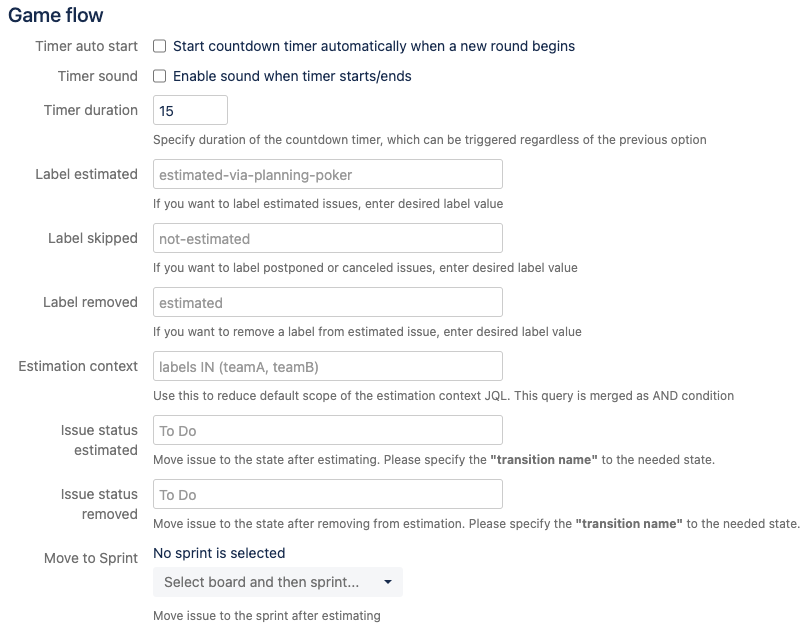
Timer autostart
If checked, this will automatically start a round timer's countdown at the beginning of the voting phase of the round. If the timer limit is exceeded, the round's voting phase ends whether or not all the users have cast their cards. The default timer duration is 45 seconds.
Waiting for players in the first round
Timer autostart won't trigger on the very first round of the game. Planning Poker assumes that the scrum master has to ensure the presence of all necessary game participants.
Timer sound
Enable/disable at the start and end of the timer.
3. Timer duration
This input allows changing the round timer duration from a default 45 seconds to any other value in seconds. Changing a default 45-second value will affect both the timer autostart (if enabled by the above option) and the timer started by admin's actions.
4. Label estimated, skipped, removed
Estimated. If this field isn't empty, a label will be added to an issue after estimation was successfully saved.
Skipped. If this field isn't empty a label will be added to an issue after the game admin presses either the "Skip and postpone" or "Skip and remove" button.
Removed. If this field isn't empty, a label will be removed from an issue after estimation was successfully saved.
Labels naming and labels usage
Label names can't contain any white spaces, so format appropriately eg. label-name, label_name.
Later on, you can view and delete a label when browsing issues. It will also be used to perform advanced issues search via Jira Issues and filters service.
5. Estimation context
Estimation context is a highly-advanced and very powerful feature deriving from a relative nature of a scrum estimation approach.
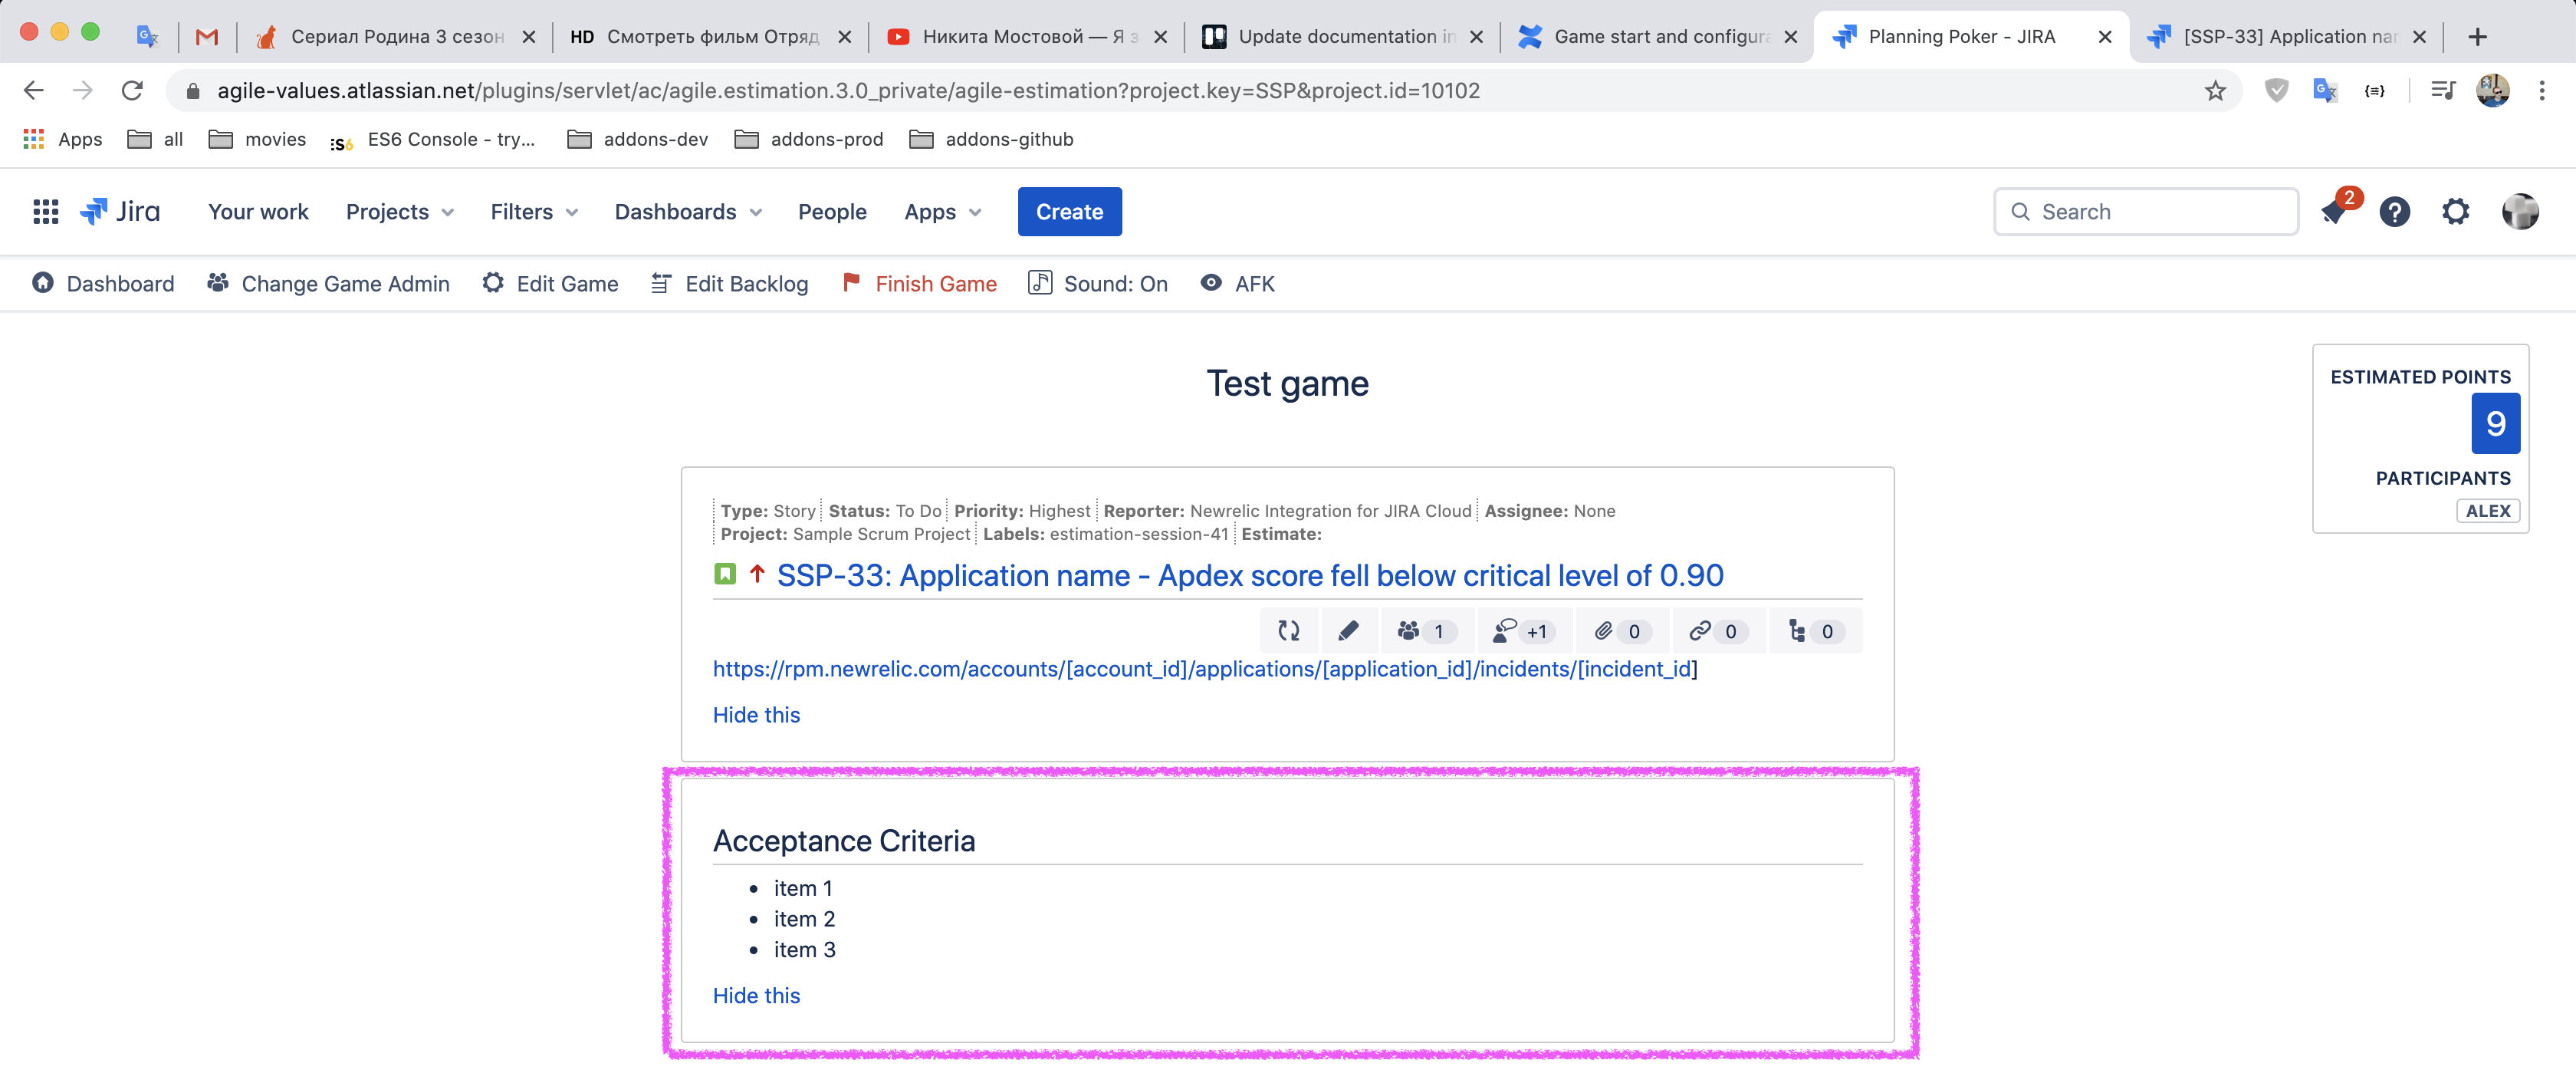
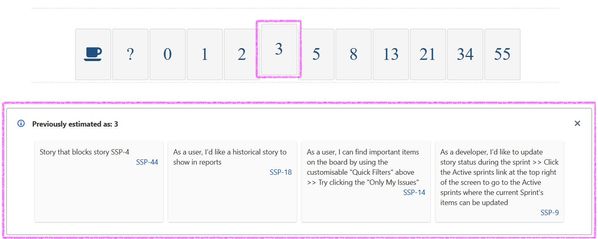
Take a look at the excerpt from a voting phase example below.
If a voting phase starts and you haven't hovered over any cards in the deck yet, the estimation context section will be empty. It will inform you that estimation context will appear in it once you hover over a card.
![]()
For example, if you hover over a card with a value of 3, Planning Poker will look through the project current issue located in, and will show all other issues that have been previously estimated as 3. Same with other cards.
Estimation context behind the scene
As it is tightly connected to the game configurations, you should be aware of how estimation context logic works in the back end.
As mentioned above, Planning Poker will query for previous estimation values within the project current issue located in.
Planning Poker will query previous estimation values only on a field you've chosen in "Export estimates to" dropdown during current game configuration.
If you've set up Deck mapping, Planning Poker would be querying for a previous estimation values equal to a value mapped to a card front.
Estimation context functionality gives game participants huge relative clues on how they may estimate similar issues. And here is where a need for more flexible estimation context control comes into play.
Say you have a project with a vast number of opened and estimated issues with numerous topics, labels, categories, and even teams. But your new Planning Poker game goes around issues connected only with your product's look-and-feel. Therefore you want to limit the game's estimation context to matters of design and user experience in order to give players the most relevant clues on previous estimations.
To do so, you will use Estimation context setting, issues' labels, and JQL. You will set the game Estimation context section to display only estimated issues, that have "design" and "ux" labels on them. It will require you to type the following JQL query to Estimation context settings input: "labels IN (design, UX)".
And that's it: from now on Estimation context section will display only estimated issues of the current project labeled with "design" or "ux".
Jira Query Language
In order to build JQL queries different then one shown above, you have to be familiar with Jira Query Language (JQL).
7. Issue status
You can choose a state (To Do, In Progress, etc) to transition the issue after estimating it.
8. Sprint
Same as above but for the sprints
Settings presets
When you're creating your first game, you will be provided with a set of default configuration values.
But Planning Poker is smart enough to remember the settings you've saved before. If you've saved a game configuration, your settings preset will be saved in your user's storage. When you start a new game, the previously saved settings preset will be applied as a new game default configuration values.
For example, if you've chosen "Story Points" field in "Export estimates to" dropdown and saved this configuration, next time when you will be creating a game, "Story Points" will be suggested as "Export estimates to" option by default.
This is useful behavior in that it will help a particular scrum master maintain his or her configuration style throughout numerous games.
User-based. New games limited.
As it is mentioned above, settings presets are user-based, meaning, that when creating a game, a different user will have a different set of default game options, saved by him previously.
Obviously, the settings presets feature is only relevant for newly created games. Saved games will fetch their settings from a database when being edited.
After you've finished all the configuration preparations you can start an actual game. A breakdown on a game process is provided in "Game Details" chapter of this Guide.